If you’ve been working with leather, you most likely know the frustration that comes from having an entire box full of leather remnants. You know those pesky smaller pieces that are left over after you create your craft leather masterpiece? Those are leather scraps and being creative with what you do with them can work wonders for your crafting skills.
Whether you’ve been working with leather for years or you are just getting started, knowing what to do with your leather scraps will not only help you elevate your craft game, but will also help you reduce waste.
Most artisans who regularly work with leather push these extra pieces to the sides for months, even years, and try to repurpose them with small projects like keychains, bookmarks or bracelets. But these smaller projects don’t help to clear the space out.
Have you ever wondered what to do with these leather scraps? We have too, which is why we put together this special tutorial on how to make a leather welcome mat completely from leather scraps.

This fun leather project will use most of your scrap pieces, making it an efficient project to keep your shop and creative area waste free.
Plus, if you are looking for a memorable gift for your family or friends, this one will blow them away. It also makes a popular item to sell. Consider adding it to your Etsy store or showing it off on Pinterest or Instagram.
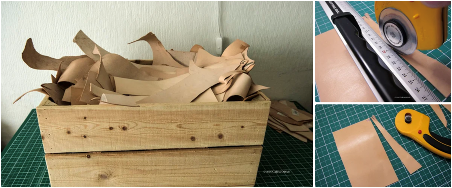
Chances are if you are reading this, you are a leatherworker and you have scrap leather lying around, but if you aren’t or don’t have scrap leather, there are plenty of old leather items you can use.
I had an opportunity to visit the gorgeous workshop of Portland Leather Goods in Southeast Portland and was in awe of how many leather scraps they had. Bins of hundreds of thousands of small pieces—all sizes, colors and shapes. When the owner told me they are giving scraps to artisans who are creating projects, my mind immediately went to this project, because not only does it use a lot of small scrap leather pieces, but it makes a beautiful project you can be proud of for years to come.
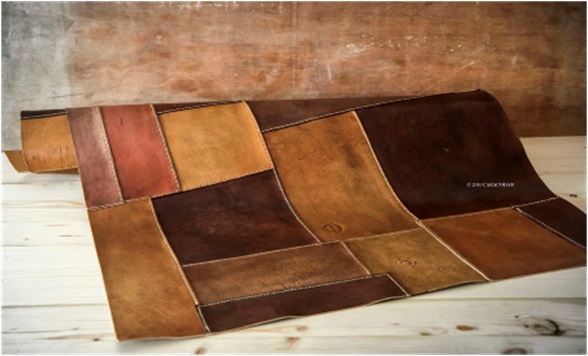
The types of leather you use can vary for this project. We suggest a vegetable tanned leather, which you can die and finish. The vegetable tanned natural leather is a good choice if you plan to stamp and tool the leather. Chrome tanned leather is another option, as it comes already colored and finished, so it is less work for you. It also has a nice patina. However, it already comes with a pattern on it so you will not be able to stamp it yourself.
You may be thinking about ways to make this project even easier. For example, if you have a machine for leatherwork, you could be dreaming up stitch solutions, but this project is fully hand stitched. Don’t use a machine even if you have one, because the stitch itself will be too big, and if you are planning to use it as a rug or welcome mat, you want the stitches to be as strong as possible. Especially since the leather mat could get a lot of use over the years.
If you want something durable, special and long lasting, nothing will be as beautiful and sturdy as saddle stitching. One of the downsides to sewing with the machine is, when a stitch breaks the whole seam line will get loose and the project will quickly fall apart. This won’t happen with the hand-sewn saddle stitch.
Although saddle stitching can be tedious, it is always worth it.
If you want to brush up on your saddle-stitch skills, see this article here
Step 1: Gather Supplies/What You Need:
- Leather scraps (Portland Leather Goods is giving scraps away. See here.)
- Leather knife or a rotary knife
- Leather antique dye (if you are using vegetable tanned leather scraps)
- Leather finish
- Stamping tools (if you are using vegetable tanned leather)
- Leathercraft cement
- Stitching needles (2)
- Waxed polyester thread, 1mm
- Pricking irons or stitching punches
- Stitching pony/clamp
If you are using chrome leather, you do not need any coloring stuff because chrome leather is already dyed and finished.
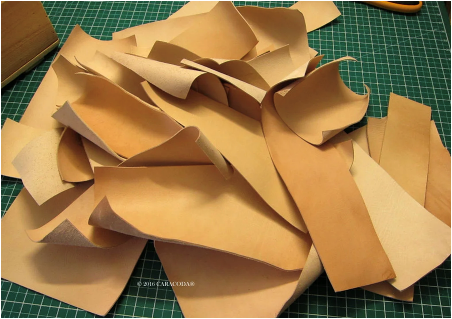
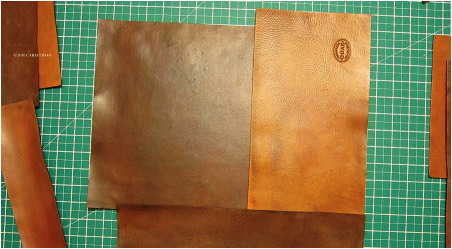
First look through your leather scraps and pick out the largest pieces. Even the small pieces put together will create a beautiful outcome, but know that the smaller the pieces are, the more work will be required from you because of the added stitching. No matter what you choose, large pieces or small, the welcome mat will create a beautiful experience each time you and your guests come to the door.
Next you will want to sort the leather by size and then thickness. Try to use pieces of the same or almost the same thickness. If you have to mix the weight, size and thickness, it will still work, but it is easier for you to create when the thickness is similar.
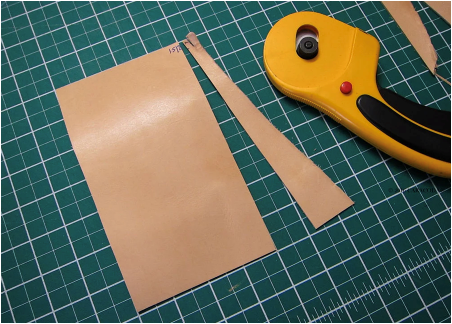
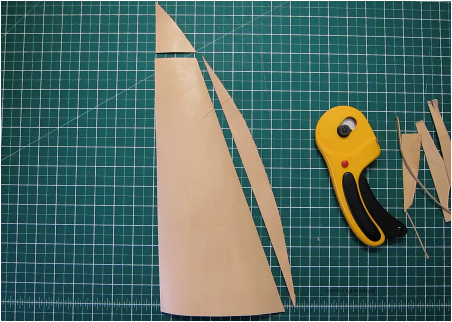
Step 2: Cut Your Leather
Now you want to take your ruler and the rotary knife or round leather knife and cut rectangular and square shapes out of the larger pieces. The reason you are creating more symmetrical pieces is because you will be fitting them together like a puzzle. Even though the sizes are different, you want the stitching to be even.
Do your best to cut as much of the leather as you can. The aim and ultimate goal is to make minimal waste.
Step 3: Arrange the Leather
After you cut the pieces into squares and rectangles, you can arrange the pieces on the floor or your work table. Arrange them side by side. This will help you gauge the total approximate size of your mat. This is a good step to gauge the end product. If you think it is too small, now is the time to add more leather. On the flip side, if you see that the mat is too big, you can always remove some pieces. Although bigger can sometimes be better, because the goal is to also use most of your scrap leather and have little to no waste.
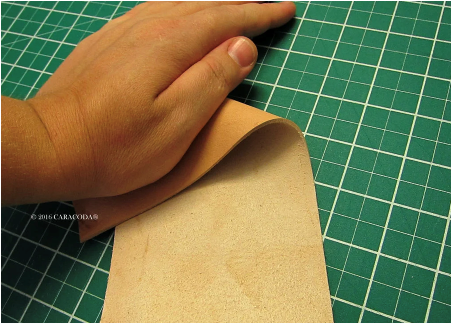
Step 4: Knead the Leather
Next you will want to knead the leather, and you can do this with your hands. Pay close attention to the thicker pieces and make sure they get extra handling. As you work with each piece, fold the pieces together. Make sure the grain is facing inside (the top surface inside) and roll the leather. Press extra hard where the fold is. You are rolling in all directions to break in the fibers. This also helps to soften the leather. You may notice that this process creates a distinct web of tiny wrinkles that overlap and cross each other. This is part of the process, and it will create a beautiful pattern when antiquing the leather.
Step 5: Decorate the Pieces
If you are using chrome leather, you will want to skip this step.
This step is for vegetable tanned natural leather.
It’s time to dress up your leather with decorations. The style you choose is up to you, but don’t hold back—let your imagination run wild.
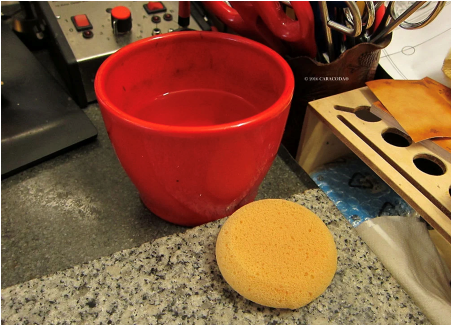
First you will want to case the leather. You can do this by applying clean water with your sponge. Don’t put too much water on the leather, but enough water to ensure the leather is wet halfway deep. Leave the leather pieces to dry for about 30–60 minutes. When you see the surface looks dry but it feels cold to the touch, this is the perfect time to use it, because you will want to have moisture in the fiber of the leather. Not only will it be easier to work with but it also helps to create that beautiful finished look.
When it comes to decorating your leather, you have a lot of options.
Option one: Go au naturel
You could leave the leather in its natural state. When you allow the natural pattern to shine, it really makes a statement and can speak for itself.
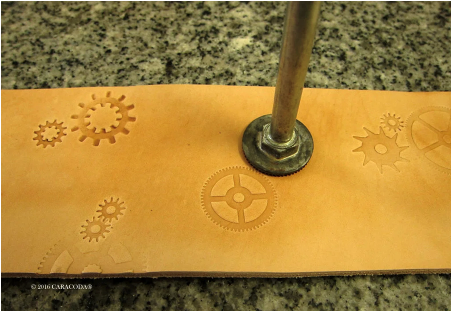
Option two: Use stamps
You can use stamps of any kind to add impressions and make a statement with signs and symbols. If you prefer to use leather stamps, you can but it isn’t necessary. You can use anything to make an impression, such as coins, gears or tableware. Some have successfully used things like rocks to hit leather, which can create a nice print. Another way to get an instant pattern is to use tires. You can run your bike tire over the leather or drive your car over the leather. This will imprint a pattern instantly.
Option three: Engrave
You could engrave or tool the leather. This itself is a precise, delicate art that takes time to learn and do but it can create an elegant look. Many leather saddles, belts and boots use the tooling and carving technique. Watch this video to learn how to tool and carve leather. https://www.youtube.com/watch?v=rfv3iQYDUgs

If you have your own logo or stamp, this is the step where you will use it.
Step 6: Applying Antique
If you are using chrome leather, you can skip this step as well. This step is for vegetable tanned natural leather only.
Because your scrap leather could be from different hides, tanning, or animals, or of different thicknesses ages, etc., the characteristics of each leather will result in a very different look and tone. To create a unified look, you will want to antique the entire mat. Which means all leather scrap pieces will get attention with this process. When you use antique, you hardly ever get identical colors.
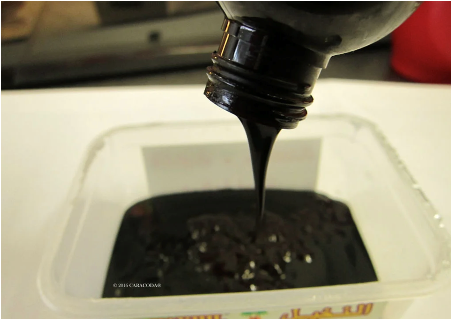
Start by pouring some paint into a bowl. Then use a piece of sheep wool to apply the paint to the leather in circles. You will want to do this on both sides of the leather. When you are done, remove the excess paint with a paper towel. The paint may dry fast so you will want to dampen the paper towel a bit with water if you need some moisture.
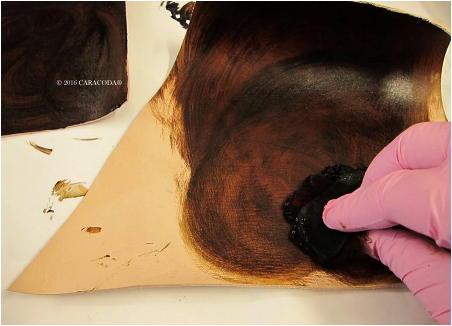
After you paint both sides, you will want to allow the leather to dry for a few hours. Then buff the leather with a piece of sheep wool or an old t-shirt.
Next you will use an acrylic leather finish to seal the paint. It will be normal for it to pick up some color, just trust the process. Leave this to dry completely overnight.
Step 7: Glue the Pieces
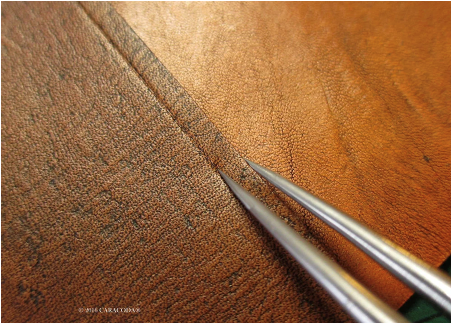
After the leather pieces have dried completely, you can start to sort through them by looking at the shape. Start with the biggest pieces. The larger the pieces, the easier to assemble, so putting them into groups will help you organize the mat. Take the pieces and arrange them next to one another so they are side by side. Once you get three to four pieces lined up and you are 100% sure this is where you want them to go, you can secure them in place by gluing the edges together. To do this, you will take the edge and slide it over the top of another piece of leather.
.
There are lots of manufactures of glue to use for this project, but we recommend a water-based leather craft cement (the one we use is from Tandy). You will connect the pieces approximately 8–10 millimeters from the edge. Once they are connected and in place, apply the glue. Let the glue dry until it is tacky and then connect the leather pieces, applying pressure to ensure the glue sticks and the leather stays in place.
Step 8: Start Stitching
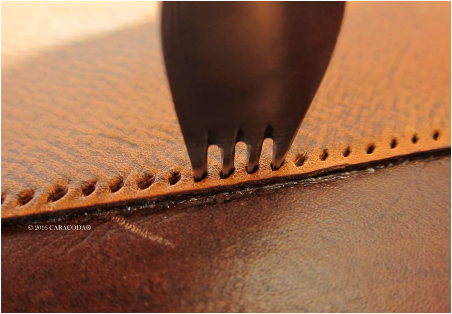
Next you will want to use a pair of dividers to mark a stitching line at least 3–4 millimeters from the edge. Use stitching prongs or pricking irons to punch holes into the leather. These are your stitch-in holes. Normally marking the holes is adequate but because you will be stitching together a large mat, punching a hole into the mat in this step is recommended. This will make the stitching so much easier.
Next you will take two stitching needles and the waxed polyester thread. Note: You can use any other thread—just like working with linen, it is not a hard-and-fast rule.
Now you will want to thread the needles. Fix the leather pieces in the clamp and start stitching. It is important to have a steady hand and level the needles after the first stitch. Make sure you have an even length of thread on both sides. The left needle goes through the first hole, and then the right needle will go through the same hole to the opposite side.
After the first stitch is done, you will continue this process and do it again: left (used to be right) needle goes through the second hole to the right, and the right needle (used to be left) goes to the opposite side through the same hole.
Make sure to tighten the second stitch. You will continue this process all the way until the last two pieces. After making two to three stitches back in the opposite direction, pull the thread to the flesh side of the leather. Then cut the thread and pull tight to make into a double knot. You can use a hammer to tap the seam.
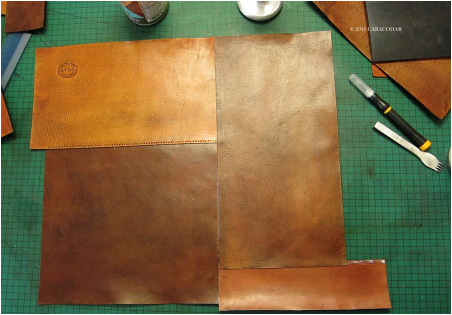
Step 9: Add More Leather Pieces
You will repeat step 8 by adding more pieces. Like filling in a puzzle, you create more of the mat by sewing each part together.
By using the square and rectangular patches, you will get a clean look. The lines will be straighter, creating a tidy look. If you use patches or cut diagonally, you will get a more abstract stitching. Both look awesome, but we suggest the straight edges for optimal mat use and versatility.
Step 10: Finish Up
The final step is to put it all together, and you can do this by cleaning up the edges. Cut a straight line using a cutting ruler (be careful to watch your fingers!).
Turn the rug over and focus on fixing the thread ends. You can use matches, a lighter or a wood burning pen to melt the tips.
There you have it. A stunning leather mat. This can be a beautiful wall hanging, a drape for your armchair or couch, a tablecloth or a welcome mat.
If you look at the mat and it feels too clean and polished, you could go for the more distressed look. You can easily achieve this by scraping the patches with sandpaper. You could do this step before you start gluing and stitching or do it after. If you wait until the end to distress the leather, you only need to scratch the center of each leather piece—don’t touch the beautiful stitching you just did. Whatever you do, don’t scratch the thread.
Finally you can use a leather conditioner to clean and refresh the leather.
Your unique/antique leather mat is finished.
The properties of the vegetable tanned leather are wonderful. It will darken with time and develop an extra gorgeous patina.
You can hang this rug on the wall, use it as an armchair or sofa cover, place it on a small door table, have it on the floor of your library or even make a cover for your car seat.
I hope you enjoyed this tutorial! Have fun with your project.
Photos by Caracoda This article brought to you by Portland Leather Goods. We make award-winning handmade leather products in Portland, Oregon, from the finest full-grain hides, creating personalized products to showcase your personal style.